Ny’alotha, the Waking City woke up! Voices.. Thousands of voices filling the mind .. this choir is driving you crazy..
Ny’alotha, the Waking City is the latest raid dungeon of Battle for Azeroth, coming in patch 8.3 Visions of N’Zoth. The last and most difficult adventure opens its doors. Ny’alotha raid’s launch is divided into several stages:
- January 21 (US) | 22 (EU) – Normal and Heroic mode launches.
- January 28 (US) | 29 (EU) – Mythic and 1st wing (Vision of Destiny) in LFR mode.
- February 11 (US) | 12 (EU) – 2nd wing (Halls of Devotion) in LFR mode.
- February 25 (US) | 26 (EU) – 3rd wing (Gift of Flesh) in LFR mode.
- March 10 (US) | 11 (EU) – 4th wing (The Waking Dream) in LFR mode.
There are twelve bosses in Ny’alotha raid. Each comes with its own tactics and unique abilities. We have a guide for Ny’alotha raid tactics in normal and heroic modes for you below!
Contents
Wrathion, the Black Emperor (1/12)
Phase 1
- Two tanks alternately hold the boss sideways to the raid, as Wrathion swipes with his tail. Tanks have to swap on two stacks of Searing Breath debuff.
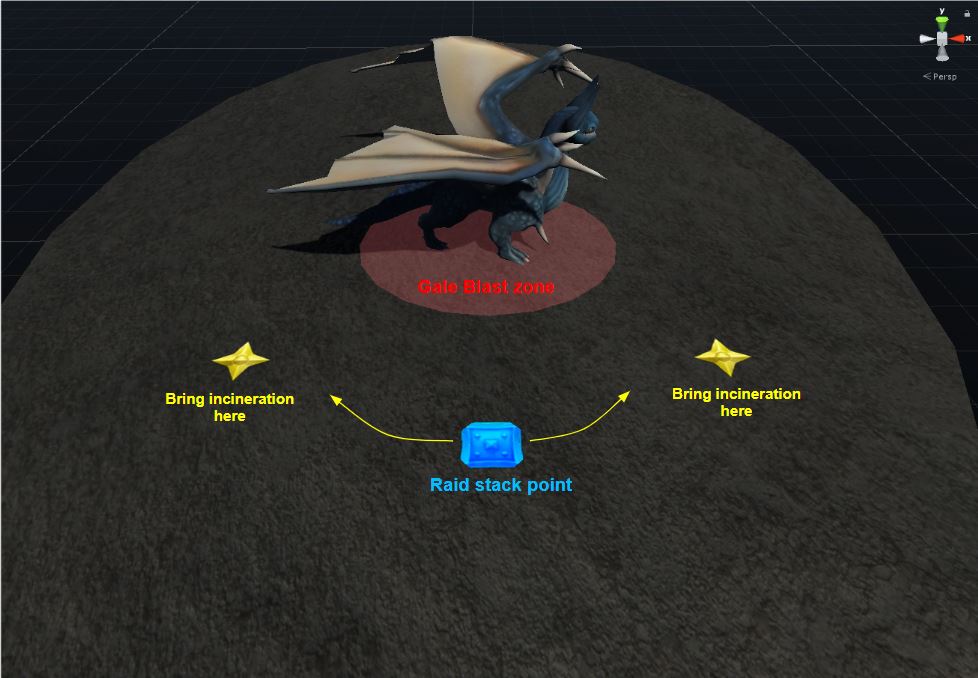
- At this time, other players must run away from the raid with the [Incineration] debuff. We advise you to stand grouped near the side of the dragon and run away with the debuff in different directions, so you will simplify the task for your healers.
- Wrathion casts [Gale Blast] blasting the area around him and creating void zones under the players feet.
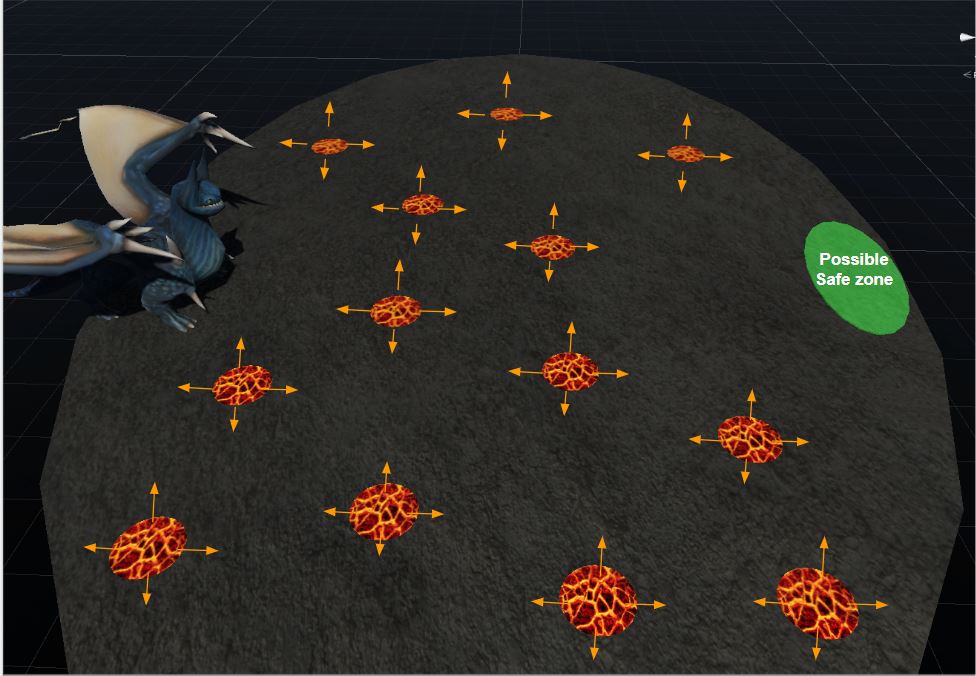
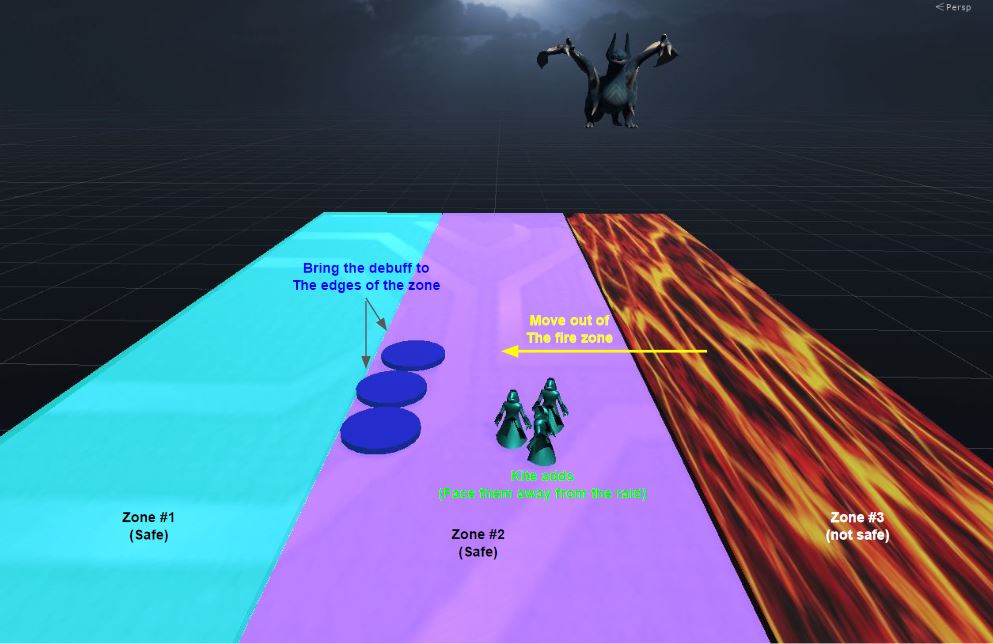
- The boss blinks to a random corner, filling the whole room with fire. Players need to run exactly to the opposite corner from the boss, there will be a small safe area without fire.
- When running to the boss, try not to get into the [Burning Cataclysm] created by Wrathion.
Phase 2
- Wrathion will become immune to damage.
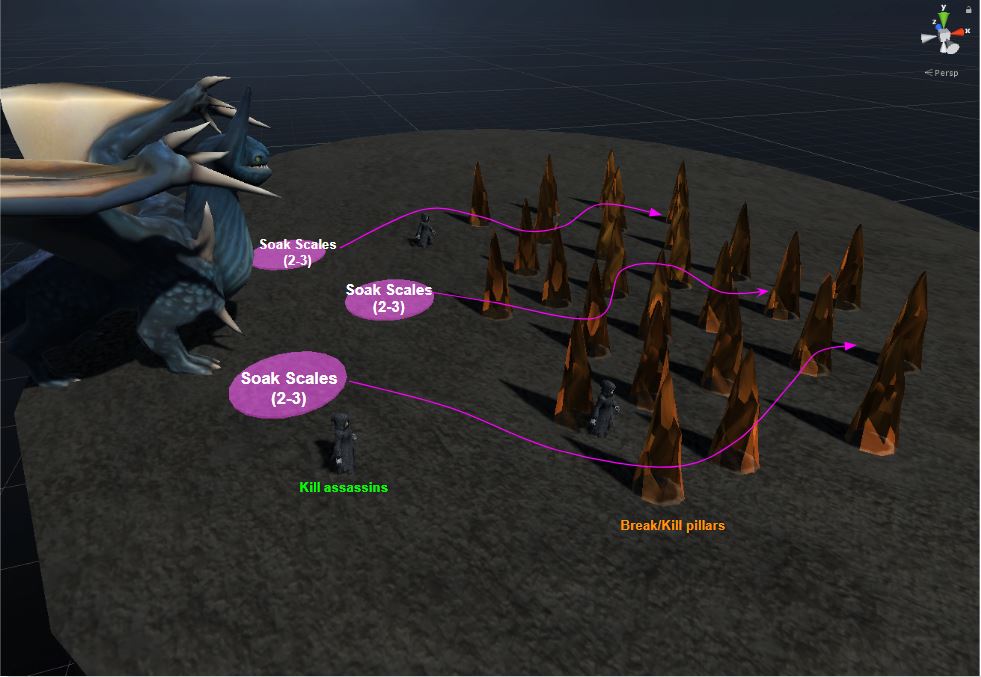
- Spikes will grow on the floor from Molten Pools.
- Three mobile players need to catch Scales of Wrathion, receiving a debuff [Burning Madness] for 10 seconds. With this debuff they can destroy the spikes by running through them. The player can destroy up to 10 spikes, each destroyed spike adds one second of debuff, so the fastest classes are needed.
- The rest of the raid needs to destroy the distant spikes before the boss recovers and blows them up. For each spike, the debuff [Rising Heat] will stack on the players until the end of the fight, this will require healing.
- + [Heroic mode] You need to reveal a few NPCs from invisibility, then damage and kill them.
- After finishing the second phase, Wrathion will start the first phase again, the phases will alternate until you kill him.
Maut (2/12)
Phase 1
- In Phase 1, Maut accumulates mana, having received 100% mana, he starts the second phase and spends mana there.
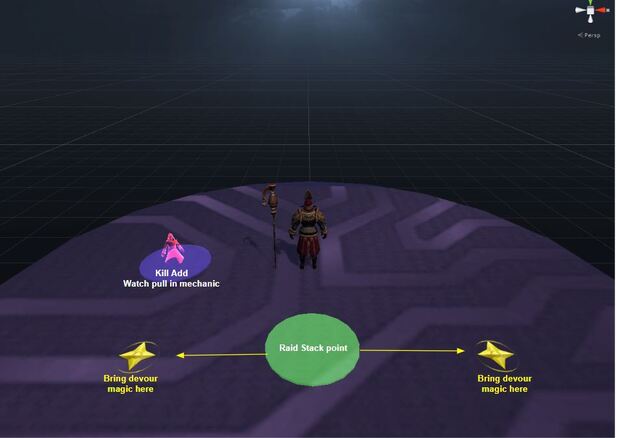
- Players who receive the [Devour Magic] debuff must run away from the rest of the raid by no less than 9 yards. The debuff leaves puddles in which players lose mana, cannot use abilities and cannot be healed, but puddles give immunity to the magical effects of the boss.
- All players need to run into puddles before Maut’s ability [Stygian Annihilation] to avoid damage from it.
- Maut creates a void zone, sucking players into it, then explodes it causing damage within a radius of 12 yards and creates a monster [Dark Manifestation]. The offtank should catch it.
- The mob has Mana instead of HP, it cannot be brought close to Maut, otherwise the boss will use [Devour Manifestation] and absorb the add replenishing his mana (Normal 1 to 1, Heroic 1 to 2, Mythic 1 to 4 ratio). The mob uses the [Dark Offering] spell, transferring 20% of its mana to the boss. To interrupt this cast, the tank must lead the mob into one of the puddles, which will stop the cast. You need to kill the mob before the second one appears, if you do not have time – feed the mob to the boss.
- Before the mob emerges, the tanks must swap each other, as Maut uses [Shadow Claws] stacking debuff.
- Phase 1 ends with the spawn of the third mob, which does not need to be killed, but you need to feed it to the boss before Maut reaches 100% mana.
- + [Heroic mode] Maut turns toward the random player and uses the [Black Wings] ability in front of him. Then throws the players back and deals damage.
Phase 2
- After reaching 100% mana, Maut goes to the center of the platform and blows up all the purple voidzones, placing a mana shield on himself and uses [Obsidian Shatter], which will kill everyone after 1 minute.
- You need to bring down the shield. Damage that players do to the shield is reflected as magic damage, use saves to help the healers.
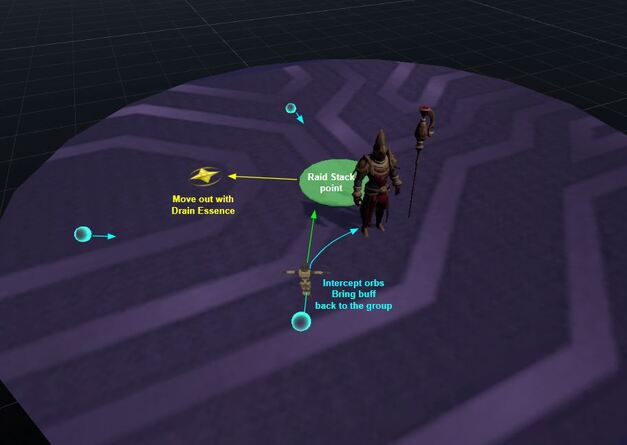
- Two tanks should intercept the spheres emerging from the altars at the edges of the room and moving towards the boss (touching them with the player model), and bring a buff to the raid that increases mana regeneration by 150% and healing by 50% for 8 seconds, which the spheres give. Spheres should not reach the boss.
- + [Heroic mode] Maut uses a DoT [Drain Essence] on several players, which you need to quickly dispel.
The Prophet Skitra (3/12)

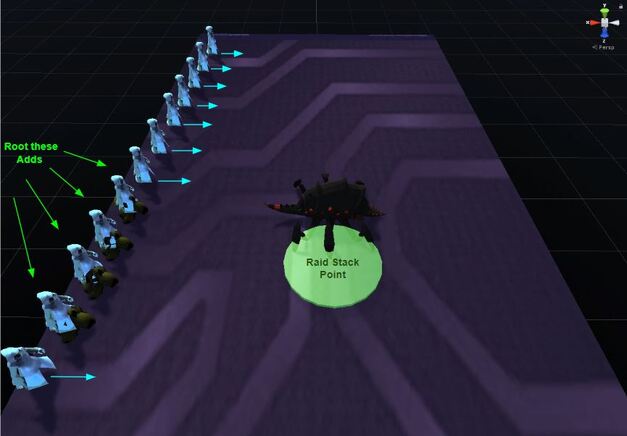

Phase 1
- Skitra very often applies quickly accumulating stacks of [Shadow Shock] on the current tank, increasing incoming damage by 15%. Therefore, tanks need to constantly change.
- Periodically, the boss uses a debuff [Shred Psyche] on a random player, the debuff explodes and a mob appears in player’s place. The player needs to run away before the explosion, the rest of the raid quickly kill the mob.
- + [Heroic mode] On one side of the room, wall of [Images of Absolution] appears, it is immune for 30 seconds, after which the invulnerability fades and their hp is set to 1. They must be killed.
Phase 2
- At 80, 60, 40 and 20% health Skitra will hide in one of the illusions. You need to quickly find and destroy the right illusion.
- Keep track of the percentage of boss, so you do not have a mob from the debuff at same time as boss uses illusions. But if it appeared, then first you need to kill the mob, and then look for an illusion.
Dark Inquisitor Xanesh (4/12)
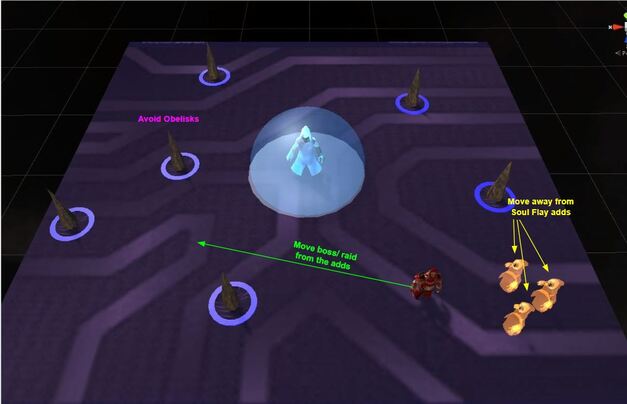
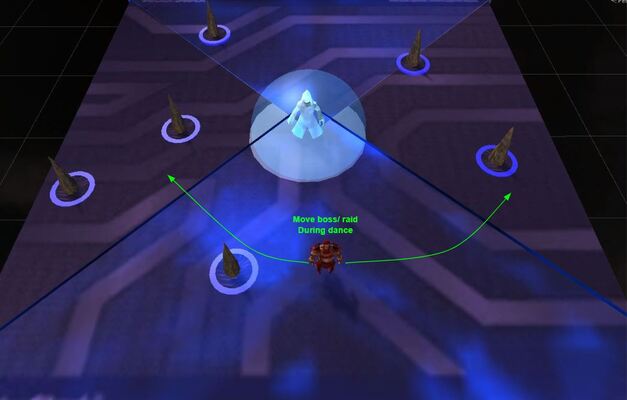

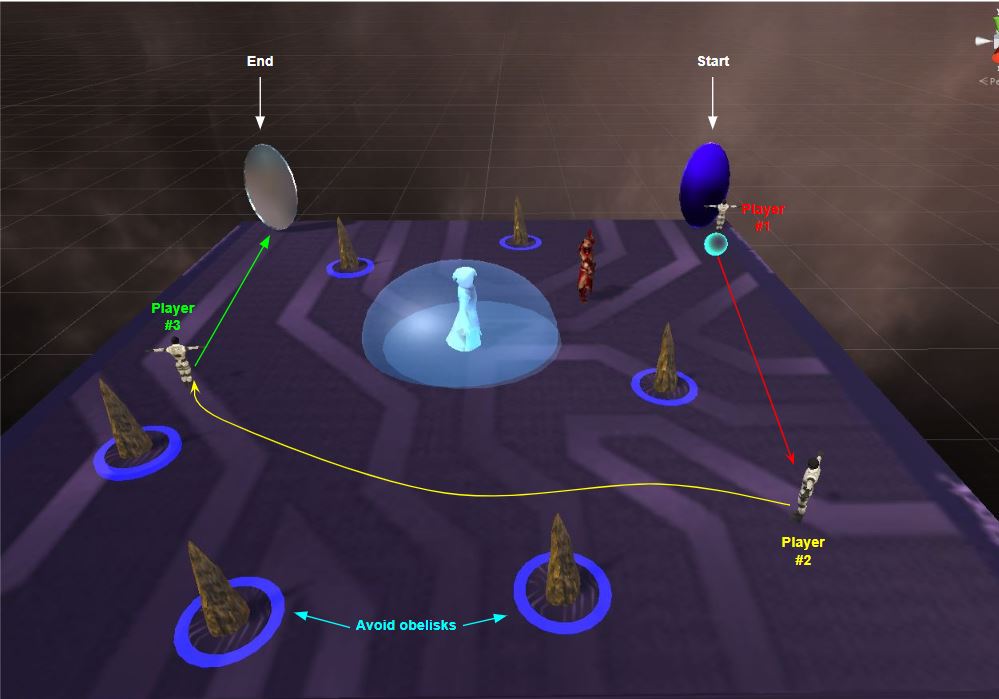
- Carefully monitor your position on the platform so as not to fly beyond its boundaries.
- Tanks swap when receiving a debuff [Abyssal Strike], the impact additionally knocks back tank by 10 yards.
- The boss creates void zones of [Torment] on the floor. Voidzones swap places in sectors, so you need to run around to free ones.
- A debuff [Soul flay] is applied to several players. A clone will appear next to the player, which will explode and you need to run away from it.
- With 100% energy, Xanesh creates three zones of [Void Ritual] on the floor, one player must enter there.
- Three players will receive a [Voidwoken] debuff that allows them to interact with the sphere. These players must roll the sphere from one portal to another. Portals will appear immediately after the ritual.
- The sphere should not touch the edge of the platform or the central zone where Azshara is located, otherwise there will be an explosion [Dark Collapse], which will damage the entire raid for half hp and strengthen the boss.
- + [Heroic mode] 1. During the battle Obelisks will appear. In their area of effect, the obelisks deal damage and slow down players. But most importantly, they are walls for the spheres.
- + [Heroic mode] 2. Players who bring the sphere to the portal will receive a 2-minute debuff [Void-Touched], which will not allow to receive the debuff [Voidwoken] again, so pre-assign groups of players who will take turns to accompany the spheres.
The Hivemind (5/12)
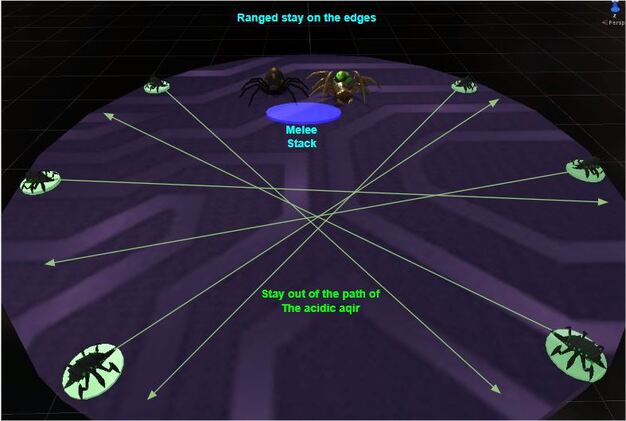
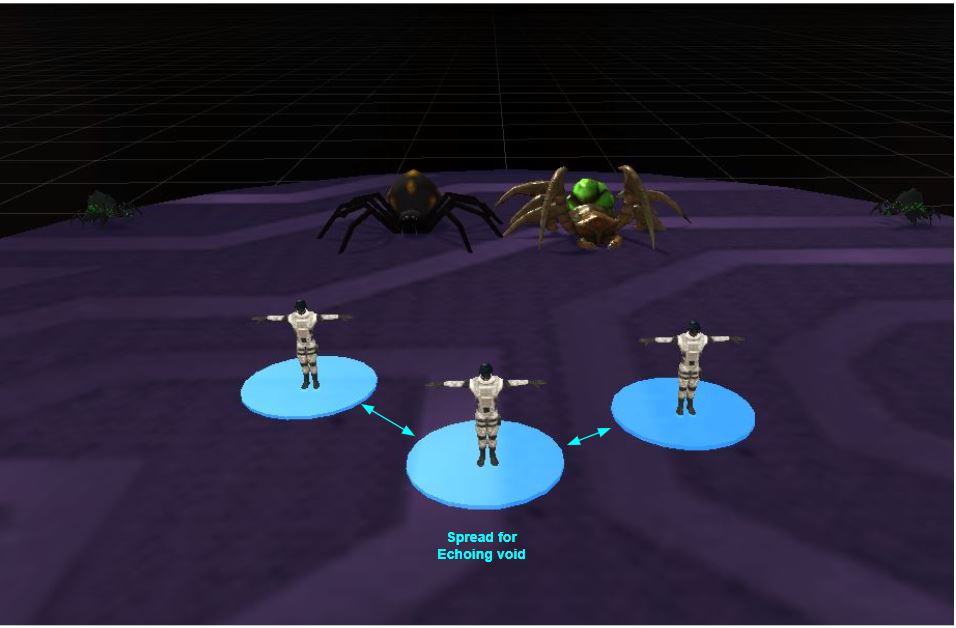
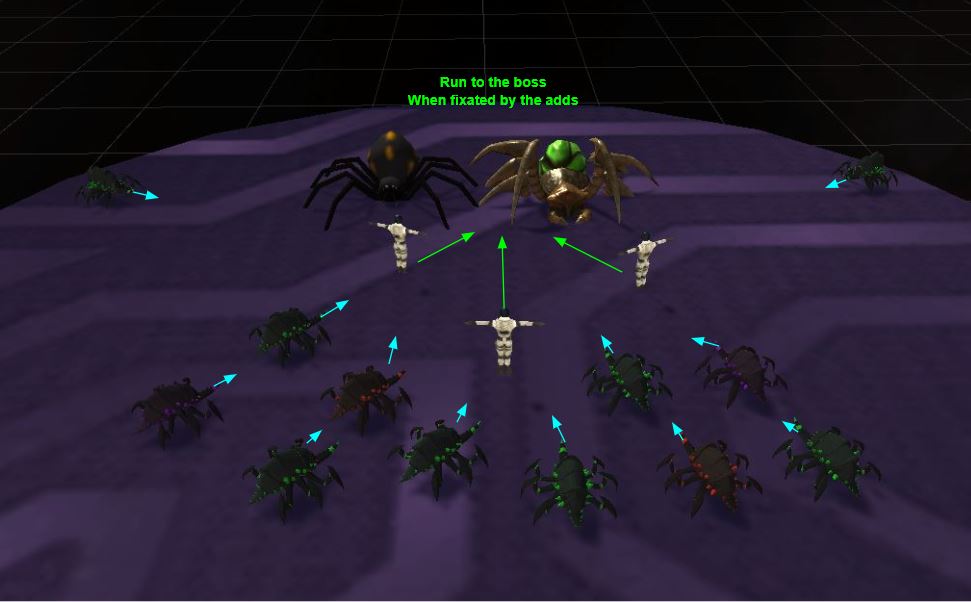
- The Hivemind is two bosses, Ka’zir and Tek’ris, who take turns controlling the swarm, so the behavior of the swarm is different, roughly speaking, battle is divided into two phases. [Hivemind] once a minute and a half transfers control from one boss to another.
- When activating Tek’ris, the bosses must be kept close to each other; when activating Ka’zir, they must be separated by at least 20 yards.
- + [Heroic mode] It is necessary to heal a DoT, which is applied with each change of control, each time the DoT is strengthened by 15%.
- + [Heroic mode] One of the Aqir drones turns into a destroyer, increasing its damage by 450%, one of the tanks needs to quickly pick it up so that it does not kill anyone.
- The Aqirs, who were called upon with Ka’zir active, will receive a buff [Regeneration], they have to be AoE’d down below 20% health.
- One of the Aqir drones mutates, increasing his HP by 150%, he needs to be killed in 20 seconds, otherwise he will cast self-destruction and cause great damage to the entire raid.
- Be sure to kick Ka’zir’s casts [Mind-numbing Nova]. 1 Melee DPS and a tank currently holding the boss are enough to kick the casts.
- The second tank must always keep Tek’ris facing away from the raid and run away from the cleave [Nullification Blast].
- When [Entropic Echo] is cast, all players must split at least 4 meters apart to avoid large damage.
- All players must move away from acid aqirs, which move in a straight line, imposing a DoT on those who fails to move away.
- When Tek’ris is active you need to run under the boss and kill the Aqir drones moving towards several players.
- When Ka’zir is active, first you need to kill the aqir drone, who is casting an explosion, and AoE the rest down
- Most importantly, bosses need to be killed at the same time, so carefully monitor their health.
Shad’har the Insatiable (6/12)
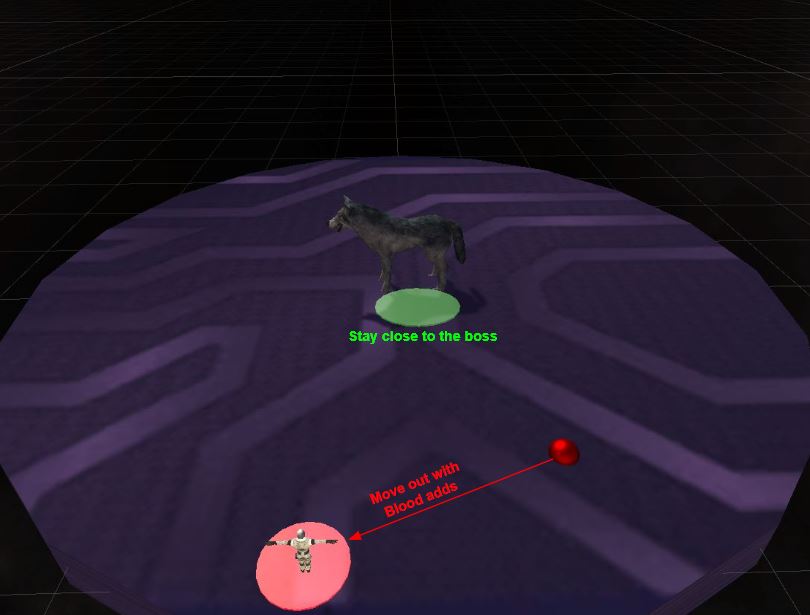
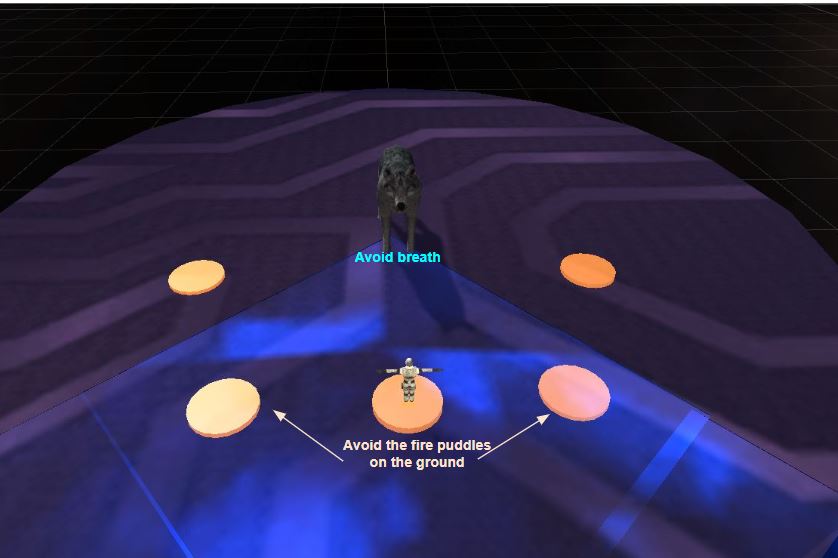
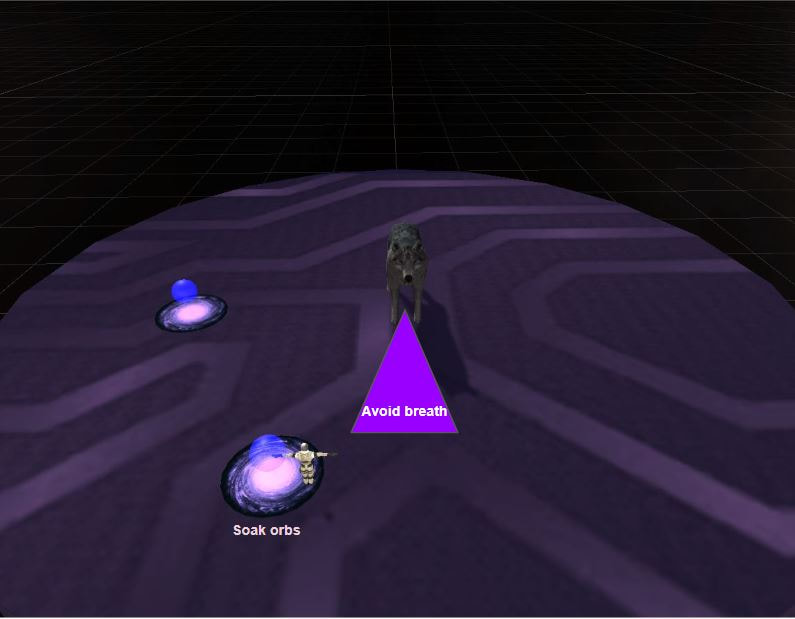
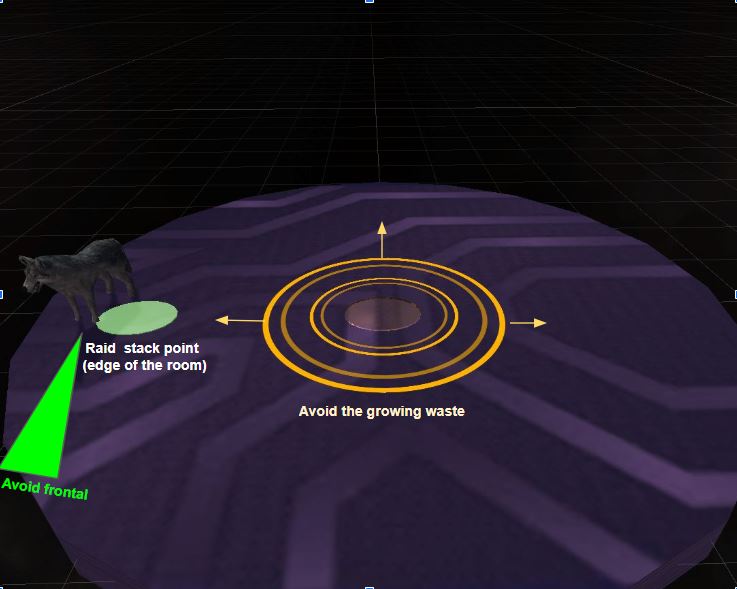
Shad’har the Insatiable has three phases, alternating at 66 and 33% hp. But the boss has common abilities that he uses in all three phases.
- The first tank holds the boss until it receives a debuff from the Ability [Crush], which increases incoming damage from Dissolve by 400%.
- The second tank must taunt the boss after [Crush], but before the next skill [Dissolve].
- Hillers must heal debuff [Debilitating Spit].
- A drop appears on the edge of the platform, which moves towards a random player. Upon reaching the player, it will explode causing damage to the entire raid, you just need to scatter.
Phase 1
- This phase is mainly for healers, they will have to heal a lot of damage throughout the raid.
- The boss uses [Umbral Breath] in the direction of one player, causing great damage and imposing Fear. You just need to run out of the zone.
- + [Heroic mode] Breath use rate accelerates.
Phase 2
- [Entropic Breath] remains, but instead of fear, it places a debuff reducing incoming healing by 50%, continue avoiding the Breath.
- Players need to transfer the boss to the third phase as quickly as possible, since Shad’har applies stacks [Entropic Buildup] and inflicts great damage. Stacks do not fall off, so the longer the phase, the more difficult it is your healers.
- It is required to absorb the spheres that periodically appear on the ground. Tip: absorb one sphere with several players, getting no more than 5 stacks.
Phase 3
- Breath and raid damage remains.
- The boss gets Enraged at 30% HP, increasing damage by 25%.
- [Bubbling Overflow] will begin to appear and grow, displacing players from the platform. The first voidzone always appears in the center of the platform, the rest will fly into a random player. Gather up and move together as a raid.
- When boss uses breath, run together through boss model.
Drest’agat (7/12)
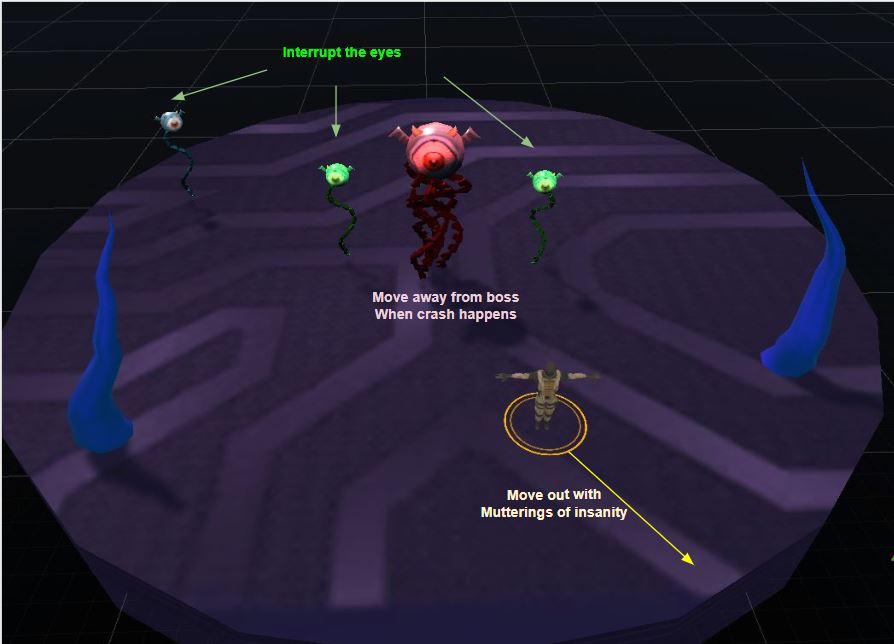
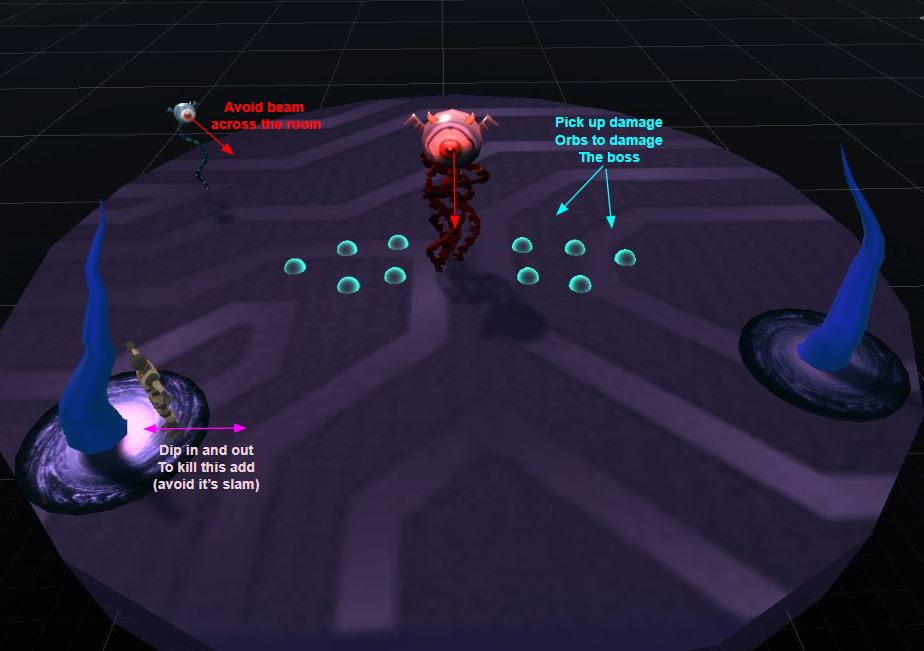
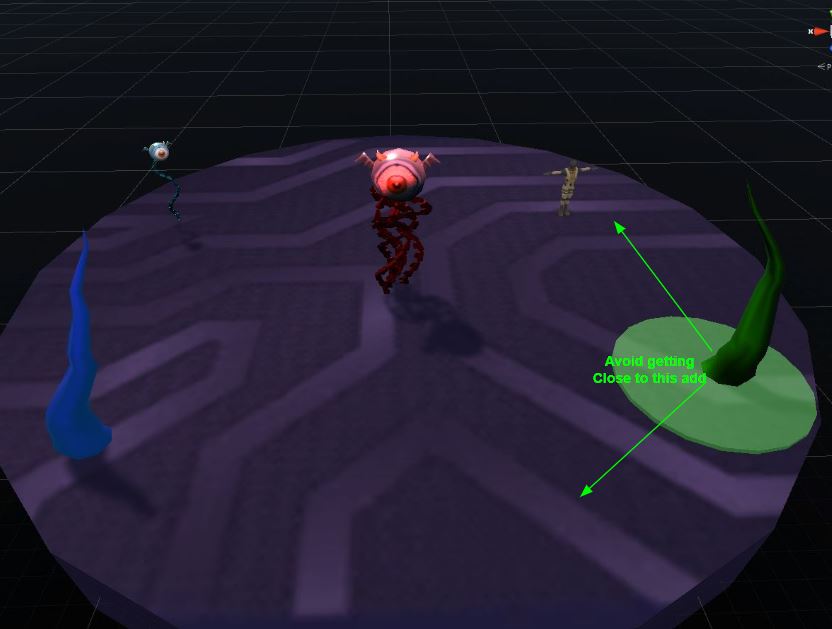
- The boss uses the ability [Aberrant Regeneration], which regenerates the normal damage done to him. Therefore, your task is to kill the tentacles, which will drop the sphere, and when interacting with the sphere you get a debuff for 30 seconds and all the damage done to the boss under the effect of this debuff is not healed. + In heroic mode. A player who receives a debuff from a sphere cannot be affected by another one and a half minutes.
- Tanks should change when they receive the [Volatile Seed] debuff, and within 10 seconds position themselves to cover the tentacles that are attacking the raid and not hurt the allies.
- Eye of Drest’agat cast a five second ray into a random raid member, dealing damage and slowing by 35%. It is desirable to kill Eye ASAP.
- Tentacle of Drest’agat hits with hard [Crushing Slam] at a small area near it. You just have to dodge this. + [Heroic mode] In a radius of 12 yards around itself, tentacles create clouds [Void Miasma]. Players inside the cloud take damage and cannot select a target outside the cloud, and players outside the cloud cannot select a target inside the cloud. Therefore, in order to beat the tentacle and heal the players in the cloud, you need to go into this zone.
- Maw of Drest’agat throws acid at random players, dealing damage within a radius of four yards. Range classes try not to stand nearby. + In heroic mode. Maw of Drest’agat applies a debuff that absorbs the incoming heal, and after accumulating 4 stacks the player is mind-controlled and starts attacking his allies. Therefore, melee classes should not attack this tentacle.
- After the death of any tentacle, the boss receives 25% energy, and after reaching 100% Drest’agat uses [Throes of Agony], this is raid AoE, which in addition activates the special tentacle skills:
1. An eye activates [Falling Gore] – these are bloody voidzones from which you must immediately run out.
2. The Tentacle hits in a straight line causing great damage – dodge.
3. The Maw uses the abilities [Spine Eruption] with rings around itself – do not get into them. - All this happens with the accumulation of 100% boss energy, which means when killing every fourth tentacle. The priority is: Maw – Tentacle – Eye.
- The boss himself applies [Void Glare] – this is a ray that hits across the room in a straight line. If at this moment there are living Eyes, then they will also use their beam. + [Heroic mode] [Mutterings of Insanity] appears – this is a five-second debuff that is applied to a random ally. The player cannot move and damages everyone around him in 12 yard radius, causing damage and stunning those in this area. Just run away from this player.
Vexiona (8/12)
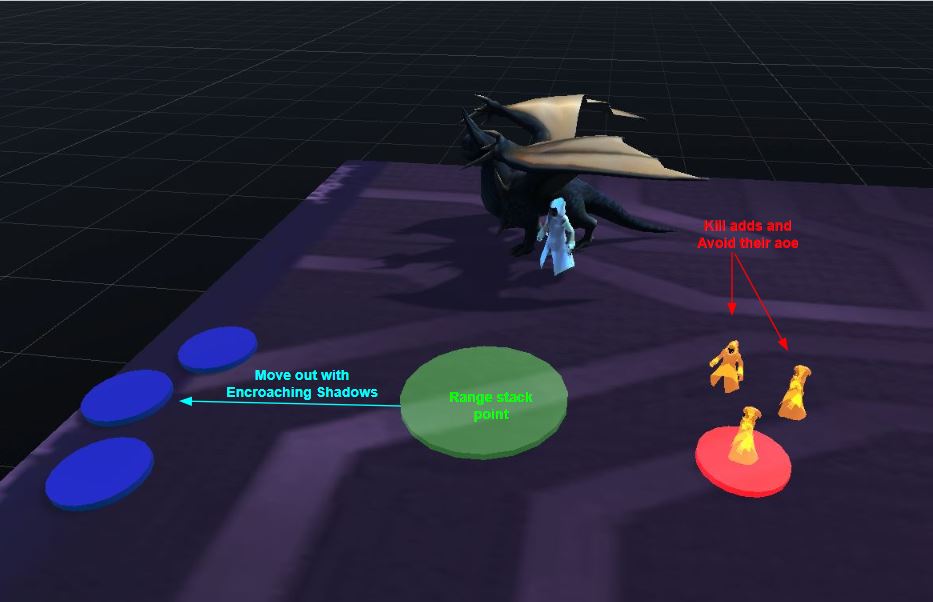
- Vexiona calls for the cult of the Nether to his aid. Having accumulated 100% of energy, it rises into the air and turns one of the cultists into the Void Ascendant.
- Before descending to the ground, Vexiona attacks the players using the [Twilight Decimator] ability.
- As soon as Vexiona falls lower than 40% of her health, she uses all her energy and needs to be killed as quickly as possible, otherwise she will wipe the raid using [Void Corruption].
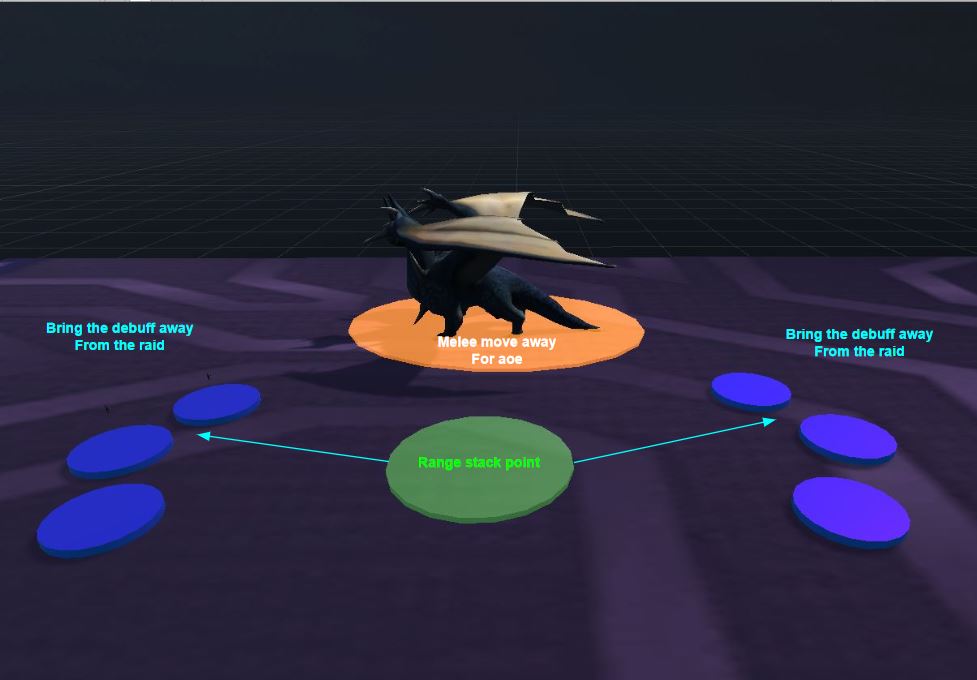
- Tanks need to turn the boss away from the raid in order to protect them from the abilities [Twilight Breath] and [Desolation].
- Also, tanks need to interact with Gift of the Void to remove [Void Corruption] from the raid.
- The raid must kill Void Ascendants to gain use of [Gift of the Void] for his tanks, destroying the cultists.
- Vexiona applies an [Encroaching Shadows] debuff on random players, which deals damage to all players within a radius of 9 yards. You just need to run away from the player with the debuff.
- Healers need to keep an eye on the [Despair] debuff on tanks and use cooldowns to save them.
Ra-den the Despoiled (9/12)
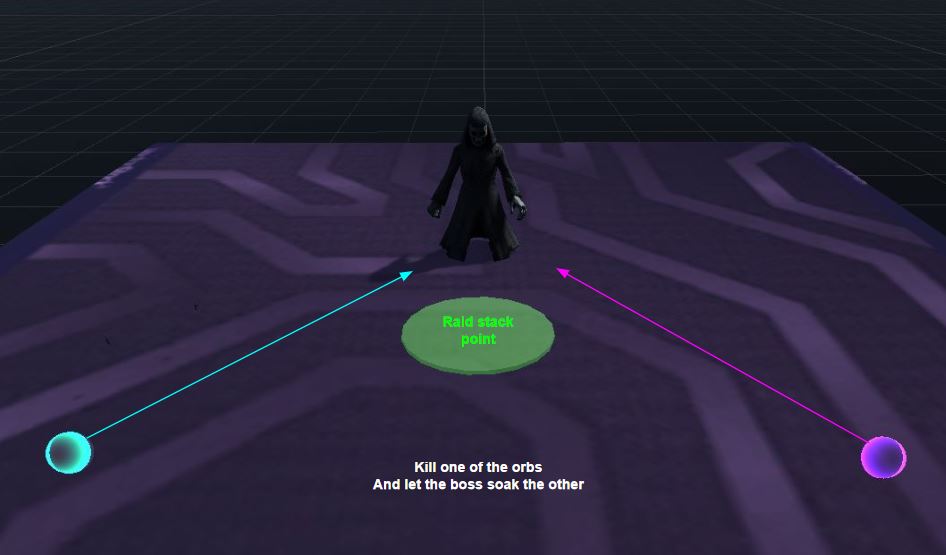
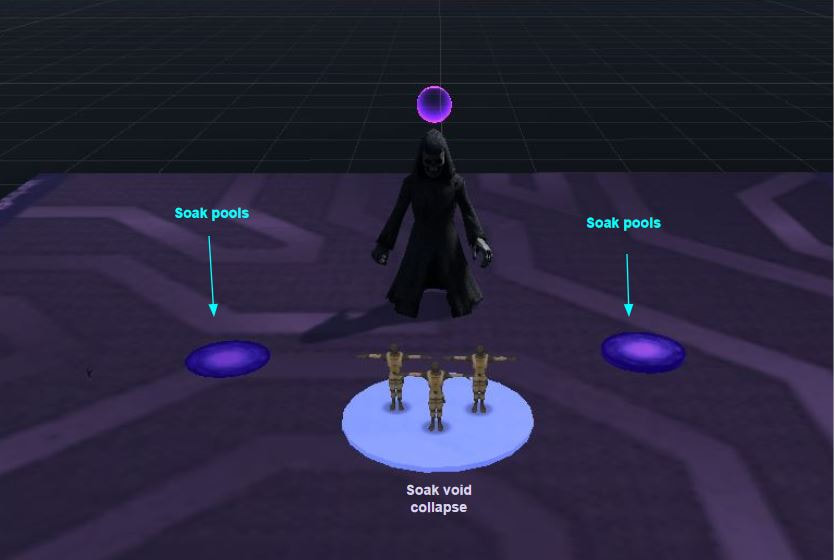
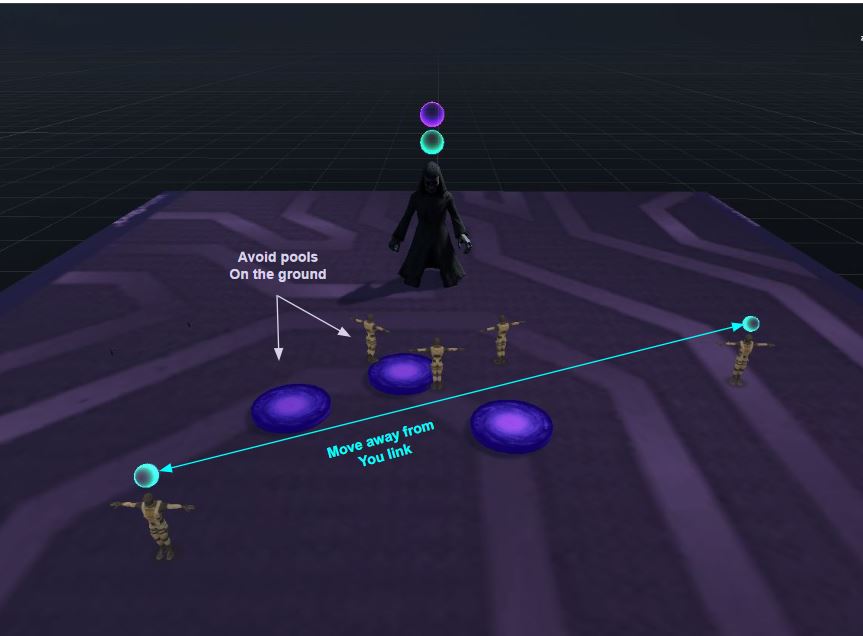
- Raden periodically summons spheres. One sphere needs to be killed, the second is allowed to be absorbed by the boss.
- Tanks must rotate the boss to absorb spheres in turn. You can’t let him absorb spheres in a row.
- Tanks need to destroy [Void Pool] to withstand the effects of [Terminal Strike]. This can be done using [Cauterizing Flare] and [Unstable Vita].
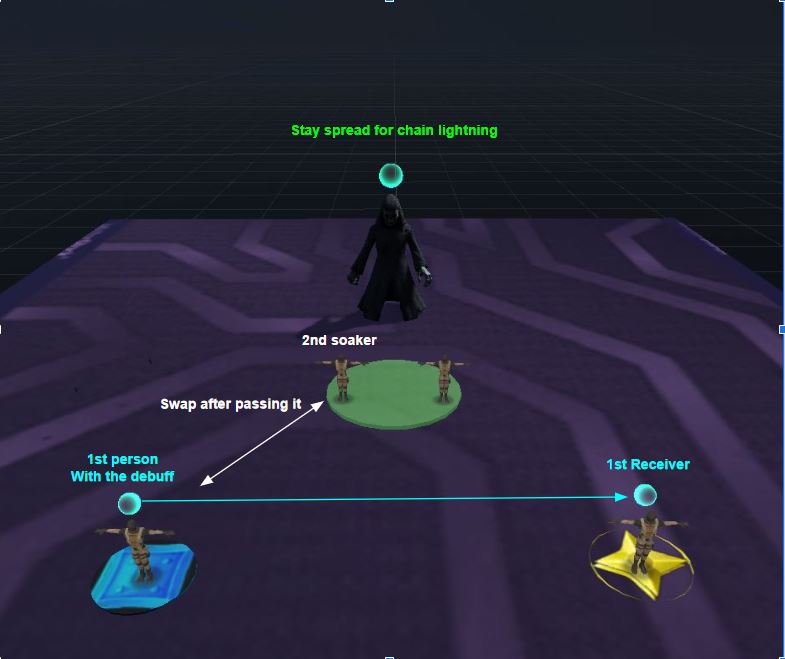
- When Ra-den absorbs the sphere, an add will appear that will use the debuff. You will need to “toss” it to each other, absorbing the damage it deals, until the stacks fall off. This debuff jumps to the farthest target every 7 seconds, catch it no more than once every 30 seconds, otherwise you will die.
- Puddles appear on the floor, which also need to be absorbed. Those who do not absorb puddles need to keep away from them by more than 6 yards, otherwise they will also receive damage from the puddles and, most importantly, a debuff for 30 seconds with a ban on absorption. Try to absorb puddles immediately after they appear.
Il’gynoth, Corruption Reborn (10/12)
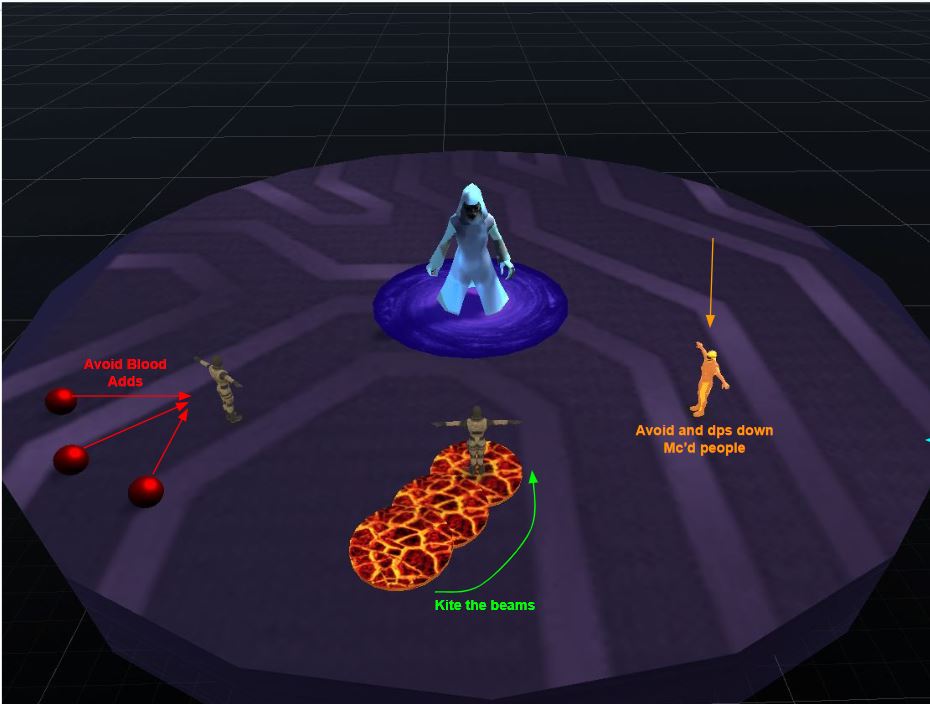
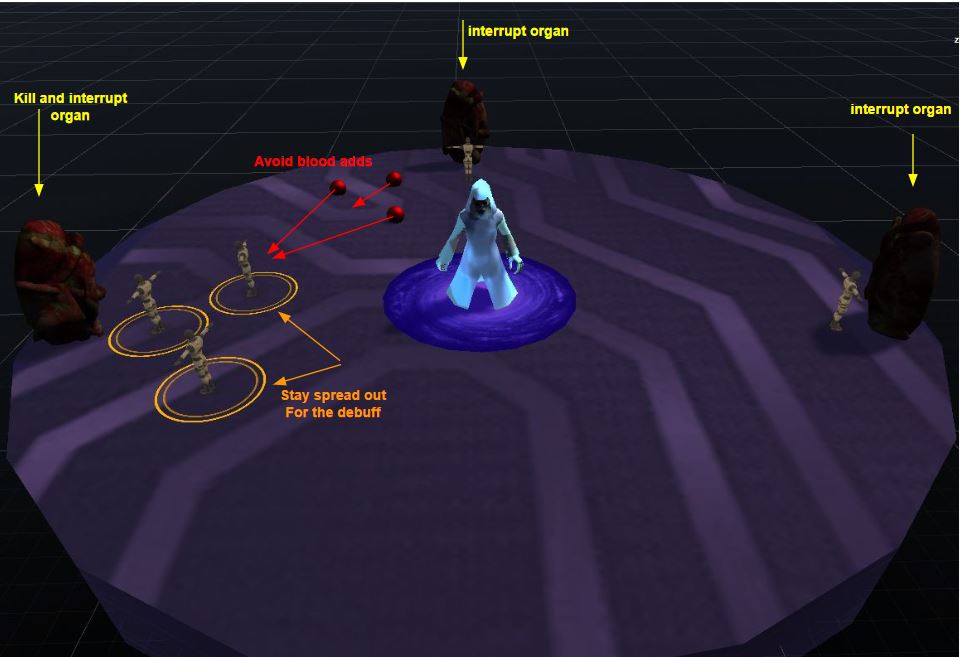
- Combat takes place in the center of the arena, when you lower the health of Il’gynoth to 0, it will hide and open the rooms with his three Organs of Corruption. These organs generate Blood of Ny’alotha, but it is possible to slow down the blood flow with interruption abilities.
- Victory over one Organ of Corr will force Il’gynoth to return with restored health. This cycle is repeated until all three Organs of Corruption and Il’gynoth are defeated.
- The boss uses mind control on the players, forcing them to fight against their allies, in order to bring down mind control, you need to lower the player’s health to 30%. You must not touch this player, otherwise you will also get under mind control.
- You will be chased by a beam, ifyou get hit by it you will receive damage and get silenced. Run away from the beam in a circle.
- Adds will appear and move to random players, when they are killed, they will inflict raid damage. Try to kill these adds as quickly as possible and do not let them reach you.
- Circles will appear under the players, causing great damage to everyone around. Try to run away from them with other players.
Carapace of N’Zoth (11/12)

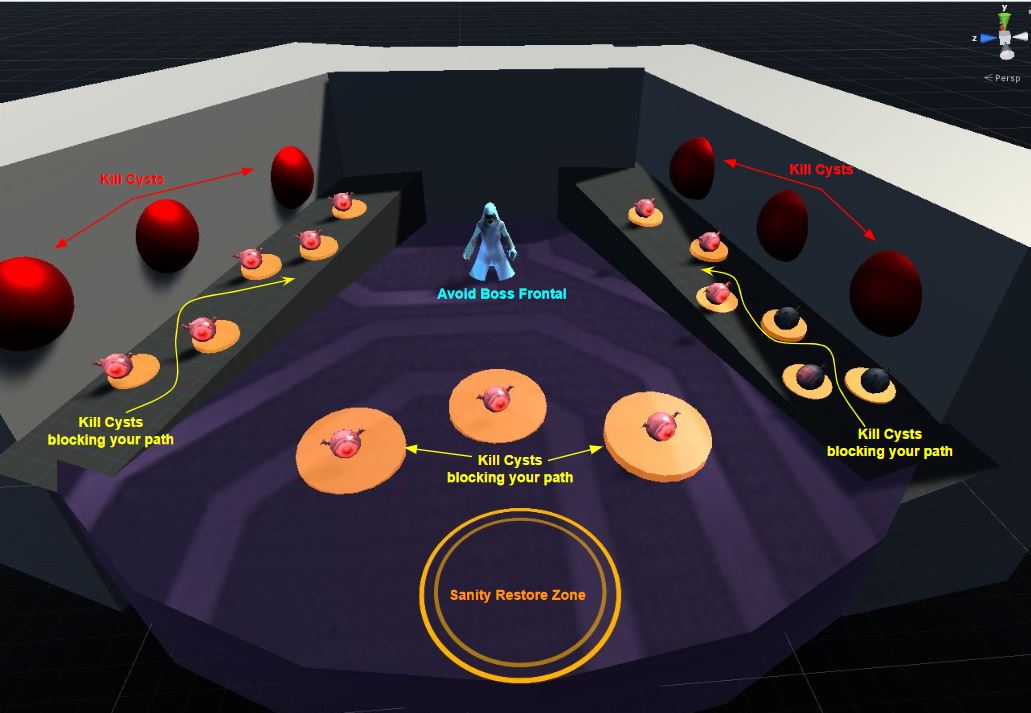
- During the combat, you lose your sanity (mind control). You will have an additional action bar to restore all your sanity by teleporting you to Wrathion (you can approach him if this ability is not activated). You can only use this ability every 2 minutes. If you reach zero sanity, you will receive a 100% increase in damage for 20 seconds, but after that you will be under mind control and it must be interrupted.
- Run away from the player who received the [Bomb of Madness] debuff for 12 seconds.
- Be sure to interrupt [Breed Madness].
- The shield that the add receives causes the add to absorb all incoming damage for 12 sec. By breaking this shield, the add will receive all the damage that has been dealt to it in these 12 seconds. The add will also drop balls to help you gain sanity.
- A giant tentacle falling from the sky casts a shadow on the ground. If you are in the shade when the tentacle lands, you will die.
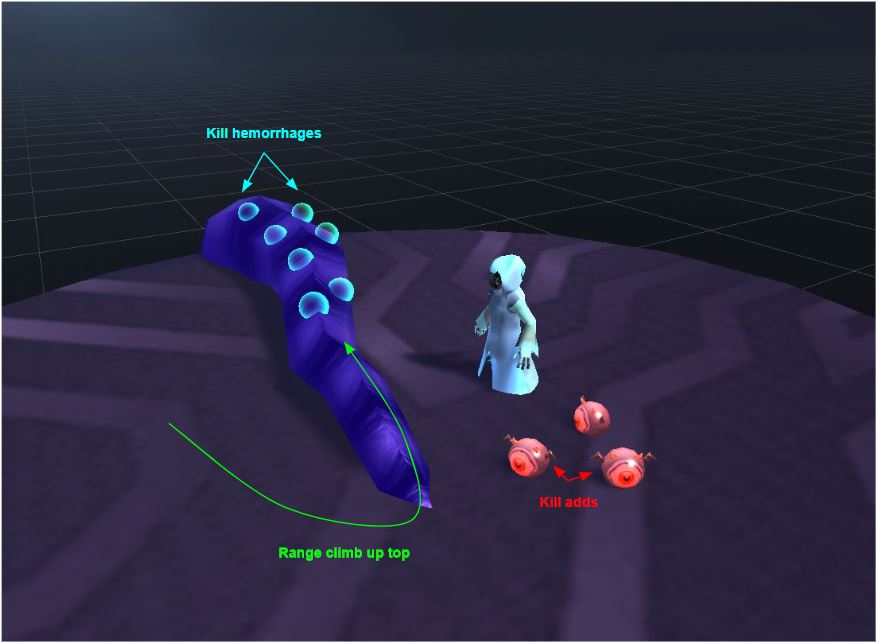
- When the tentacle lands, you need to jump on it and kill the hemorrhage within 1 minute, otherwise it would be a wipe.
- When this tentacle has many nightmares, an antigen appears. Kill them as quickly as possible after killing hemorrhages.
- Avoid the frontal abilities [Occipital Blast], which will cause you a lot of damage.
- Mycelial Cyst must be damaged in order to go through them (like on a G’huun). Keep the Fury of N’Zoth away from them, otherwise it will be buffed.
- Synthesis Growth heals the boss, so you need to kill them when you burst inside. They can be found on the walls inside.
N’Zoth the Сorruptor (12/12)
[Sanity]. Throughout the combat, you lose your sanity. You will have an additional action bar to regain 80% of your sanity. You can only use this ability every 3 minutes. If you reach zero sanity, you will receive a 100% increase in damage for 20 seconds, but after that you will be under the mind control – so it should be interrupted.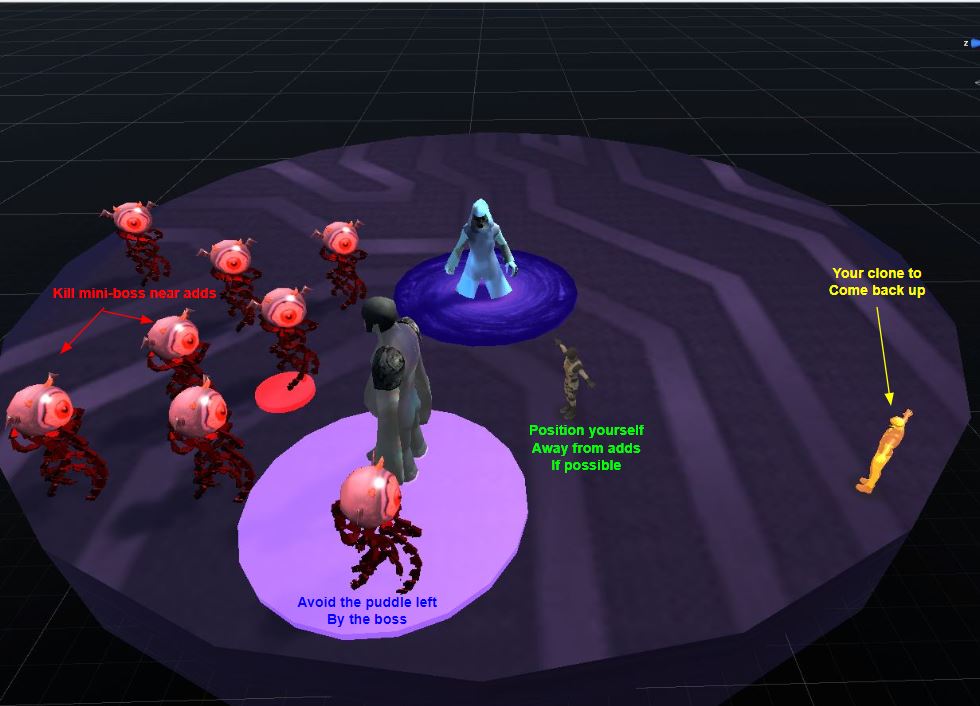
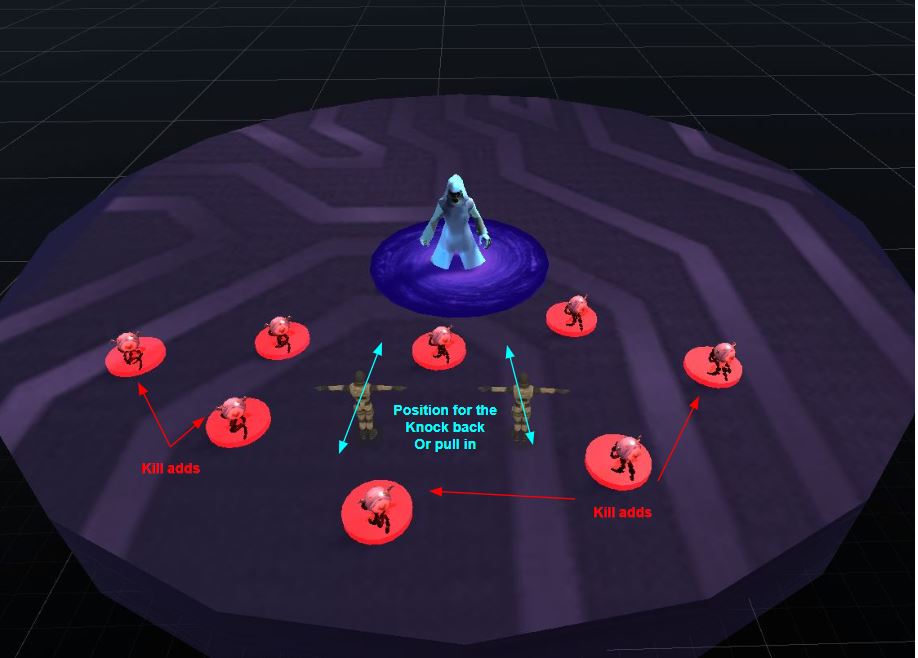

Phase 1
- At the beginning of combat you will be transferred to a parallel world. And in the place where you stood an echo of consciousness is formed – a future exit to real world. You should interact with it after killing Phase 1 miniboss – Psychus.
- [Probe Mind] The tentacles drain the health of random player and those within 5 yards, so stay spread. It is necessary to kill them one by one, since the death of one heals the rest. But it’s very important that the boss is 8 yards or less from the tentacle that died in order to get a 50% incoming damage debuff.
- The boss creates puddles underneath itself, the tank needs to kite him out of the puddles. Once in a puddle, you will receive a lot of damage and get mindcontrolled.
- It is necessary to go through this phase as soon as possible, since the abilities [Void Vision] will appear, it is impossible to avoid them. You take average damage, and most importantly lose 20% of sanity. It appears at 19 seconds, 53 seconds and 1 minute 27 seconds.
- As soon as you kill Psychus, you will go to the second phase and you will have 30 seconds to exit the parallel world and damage N’zoth while he is in the camp.
Phase 2
- After 30 seconds, N’zoth will become active and create many infected Neurons [Corrupted Neurons]. The raid should start damaging the next bunch of neurons to reduce their radius of action. Neurons cannot be killed and they heal by 5% every 2 seconds.
- [Mindgrasp]. This ability will either pull you to the boss, or away from him. Therefore, stand in such a way that you are not knocked off the edge or thrown into the boss. Also stay away from the neuron.
- As soon as N’zoth stops grasping players, all neurons will disappear, and new tentacles of three types will appear on one half of the room.
1st for tanks. Two Threshing tentacles, tanks pick them up. If the tentacles are left without an attack target, they will begin to damage the entire raid. With each hit, they deal 2% more damage.
2nd. The smaller ones will be near Threshing. They have only one ability – [Corrupted Mind] and it needs to be kicked. If not kicked, healers need to dispel the debuff.
3rd type of tentacles are to be killed last. They spit at random players with damage balls. - Keep track of [Paranoia] ability. Two people will be connected to each other. The farther you are from your partner, the more damage you will receive (stay within 5 yards). And you can not touch the players who are not under paranoia, you will lose sanity.
- In the second phase, there will also be a parallel world (repetition of the first phase), the entrance to it will open in a minute after the stun on N’zoth ends. Therefore, the raid must be divided exactly into two parts (one tank each and half of the healers and DPS). One of the two groups should go into the portal.
- But in the second phase, a couple of abilities will be added to the portal phase. Voidzones from Deathwing, they inflict damage and disorient for 6 sec. And after the second group in the real world kills the tentacles, in their place in the parallel world one more voidzone will appear. After killing Psychus, the raid will again have 30 seconds to damage N’zoth, but the group from the parallel world still needs to have time to run out into the real world. Then everything will be repeated, but the second group should go into the parallel world (since the first will have a ban on re-entry).
Phase 3
- The third phase is essentially a damage race, because N’zoth takes full damage and needs to be killed as quickly as possible. The boss continues to grasp players. Paranoia also remains in phase 3.
- Suffering – these are voidzones that appear from the players, they cause damage and quickly reduce Sanity. N’zoth applied [Causing Suffering] – a debuff that hangs for 8 seconds and upon expiration creates this voidzone. Each new use of the debuff enlarges the old puddles, so stick together and carefully pour the puddles.
- [Stupefying Glare] (N’Zoth). Creates an eye that launches a frontal beam causing significant damage to those who get hit by it, avoid.
- During the entire phase, the Reapers of Thought will appear. They cast [Harvest Thoughts] around themselves. This ability deals deadly damage and 100 units of sanity are evenly distributed among those in it. If there are not at least 5 people in it, this will drain 50 sanity from all raid participants. The raid needs to absorb this ability to minimize effects.
We have collected all the available information on the strategies of the Ny’alotha raid bosses and have tried to tell you them as briefly as possible. There are twelve bosses, and each has a lot of abilities and conditions, so the guide turned out to be not entirely short. But we hope that the Ny’alotha Raid Strategy Guide will be useful to you.